An over-fertilized plant can look thirsty, scorched, and strangely weak at the same time. Brown leaf tips often appear first. White crust may gather on the soil surface or pot rim. Growth can stop, even when the plant receives enough water. These symptoms usually point to excess mineral salts around the roots, but they can also resemble drought, poor drainage, or disease. That distinction matters.
This guide explains how to fix over-fertilized plants quickly using practical, low-risk horticultural steps. You will learn how to pause feeding, inspect the roots and drainage, and flush suitable container plants with clean water. The process must match the plant, potting mix, and local water quality. A rushed flush can damage roots or leave the soil waterlogged. Do not assume every yellow leaf proves fertilizer burn. It may reflect older stress instead. Based on standard horticultural practice, checking the fertilizer label and observing new growth provides more reliable evidence than guessing from one damaged leaf. The phrase “quickly” needs caution here. Some plants recover within days, while others need several weeks. Remove only badly damaged tissue. Leave healthy green leaves in place. Recovery is not always dramatic. New growth tells the real story. Small details matter, especially drainage holes, soil texture, and the plant’s recent feeding history. This approach favors careful correction over aggressive treatment, because the wrong remedy can deepen the original problem.
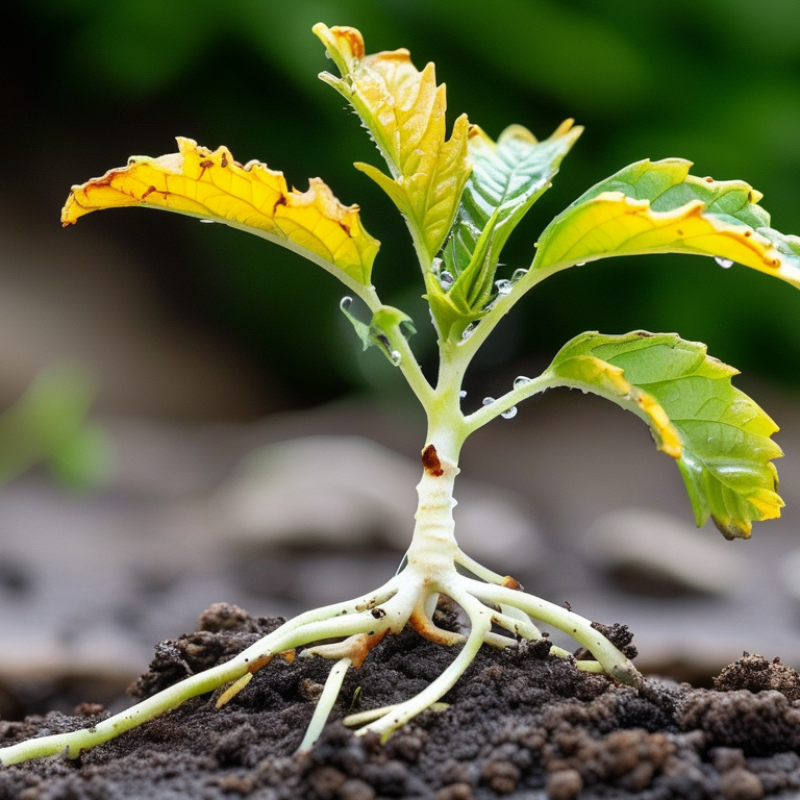
Fertilizer overload often appears before serious damage becomes visible. Look for brown leaf tips, curling edges, yellowing lower leaves, or a white crust on the soil. Growth may slow, even when the plant receives enough light and water. The soil can also smell unusually sharp or feel salty after drying. I once mistook crispy leaf edges for drought stress, then found fertilizer residue beneath the pot. That mistake taught me to inspect the roots and soil together.
Tips: Stop feeding immediately. Move the pot to a sink or outdoors, if weather permits. Slowly flush the soil with room-temperature water until it drains freely from the holes. Repeat once, then let the soil drain completely. Remove damaged leaves with clean scissors, but keep partly green leaves because they still produce energy. Do not add compost or another treatment yet.
Check the plant again after several days. Healthy new growth matters more than old damage. If the roots are dark, mushy, or tightly coated with salts, repot into fresh, well-draining soil. Handle the roots gently. I would not promise a quick recovery; stressed plants often need weeks. Reduce fertilizer strength later, and only feed during active growth. The label’s suggested amount may still be too strong for a weak plant. Conditions vary, so observe moisture, light, and leaf changes before feeding again.
Stop fertilizing immediately when leaves develop brown tips, curled edges, or a white crust on the soil.
These signs often indicate excess soluble salts, but drought, pests, and root disease can look similar. Check the roots and soil before treating the plant.
Flush the soil with room-temperature water. Place the pot in a sink, and let water flow slowly through the drainage holes. Use about two to three times the container’s soil volume. For a 20-centimeter pot, roughly four to six liters may be appropriate.
Let every stream drain away completely. Do not leave the pot standing in collected water. Flush garden soil only when drainage is reliable, because waterlogged roots can suffer quickly.
Wait until the surface becomes slightly dry before watering again. Remove badly damaged leaves, but keep healthy growth for recovery.
Avoid fertilizer for two to four weeks, depending on the plant’s condition and growing season.
I once treated yellow leaves as fertilizer damage and flushed too aggressively. The real problem was poor drainage. That mistake matters.
If roots smell sour, feel mushy, or show dark decay, replace the saturated soil and trim damaged roots with clean tools.
After recovery, resume feeding at half the previous strength and monitor new leaves rather than older damage. A simple soil-salt test can provide better evidence than guesswork.
Overfertilized plants often show brown leaf tips, curling margins, weak new shoots, or white crusts on the soil. Trim damaged growth and remove severely affected leaves before salt injury spreads. Use clean, sharp scissors, wiping the blades with 70% isopropyl alcohol between plants. Cut brown areas back to healthy green tissue, but avoid removing more than one-third of the canopy at once. This is not a perfect rule. Removing too much foliage can reduce photosynthesis and delay recovery. Take the worst leaves first.
Check the roots and soil, not only the foliage. USDA Natural Resources Conservation Service guidance classifies soil as saline at saturated-paste electrical conductivity of 4 dS/m or higher. That figure is a warning, not a universal plant limit. Measure potting-media EC with a calibrated meter when possible. University extension guidance supports leaching soluble salts with clean water when drainage is reliable. Otherwise, roots may suffocate. Remove crusted surface soil from containers and replace it. Do not fertilize again until healthy new growth appears. Wait and watch. Keep partly green leaves because they still produce energy. Recheck the plant after three to seven days, then reduce feeding if symptoms continue. My earlier mistake was pruning too aggressively; the plant looked cleaner, but recovery slowed.
| Visible Symptom | Likely Severity | Immediate Action | Pruning Guidance | Root-Zone Treatment | Recovery Monitoring |
|---|---|---|---|---|---|
| Brown, dry tips on otherwise green leaves | Mild | Stop all fertilizer applications and remove any fertilizer granules from the soil surface. | Trim only the brown tissue with clean scissors. Follow the natural leaf shape and leave a narrow brown margin. | Water slowly with clean water until a small amount drains from the container. Empty the saucer afterward. | Check new growth over the next 7–14 days. Healthy new leaves are a better recovery sign than damaged older leaves. |
| Yellowing leaves with brown or crispy edges | Moderate | Move the plant away from intense direct sun while it is stressed, and avoid additional feeding. | Remove leaves that are more than half damaged or no longer producing useful green tissue. | Flush the potting mix thoroughly with clean water, allowing excess water to drain freely. Do not leave the roots standing in runoff. | Wait for the upper layer of the mix to begin drying before watering again. Resume normal care only after fresh growth appears. |
| Widespread leaf scorch, curling, or sudden wilting after feeding | Severe | Stop fertilizer immediately and place the plant in bright, indirect light with good air circulation. | Remove severely affected leaves at their stems, but keep partially green leaves unless they are collapsing or diseased. | Flush the root zone with several volumes of clean water if the container has drainage holes. For plants in poorly draining soil, repot into fresh, well-draining mix after removing damaged roots. | Inspect the roots after several days for black, mushy, or foul-smelling tissue. Recovery may take several weeks. |
| White, crusty fertilizer deposits on the soil or pot rim | Moderate | Gently remove the visible crust and discard it. Do not mix the deposits back into the soil. | Prune damaged foliage only after removing the salt buildup; avoid removing healthy leaves unnecessarily. | Leach the potting mix with clean water and verify that drainage holes are open. Replace the mix if deposits return repeatedly. | Use new growth and normal leaf color as indicators. Avoid fertilizer until the plant has stabilized. |
| Stunted new growth with pale or distorted leaves | Moderate | Pause feeding and check whether compacted or waterlogged soil is restricting the roots. | Remove only leaves that are badly distorted, dead, or more than half necrotic. Do not cut healthy growing tips without a clear reason. | Improve drainage and allow the growing medium to drain between waterings. Repot if the root zone remains saturated. | Monitor the newest leaves for normal size, color, and shape over the next 2–4 weeks. |
| Root tips are brown, soft, or damaged after repeated feeding | Severe | Remove the plant from its container and rinse excess fertilizer from the roots with clean water. | Do not heavily prune the foliage and roots at the same time. Remove only clearly dead roots and severely damaged leaves. | Repot in clean, well-draining growing medium and use a clean container with drainage holes. | Keep the plant evenly, but not constantly, moist. Delay fertilizing until strong new growth is established. |
| Plant appears healthy but was recently given too much fertilizer | Mild | Stop feeding temporarily and inspect the soil surface for soluble fertilizer residue. | No pruning is needed unless symptoms develop. Avoid cutting healthy foliage as a preventive measure. | For container plants, apply a careful leaching watering if the product was applied at a high concentration. Ensure complete drainage. | Observe the plant for 1–2 weeks before deciding whether further treatment is necessary. |
Overfertilized plants often show brown leaf tips, curling edges, pale growth, or a crust of salts on the soil. My first instinct was to water heavily, but that can suffocate already stressed roots. Stop feeding immediately. Move the plant into bright, indirect light, away from hot glass and sudden afternoon sun. Stable light matters because damaged roots cannot support rapid leaf production.
If the pot has open drainage, slowly rinse the soil with room-temperature water until it runs freely from the bottom. Do not flush a pot that stays wet or lacks drainage; repotting may be safer. Let excess water drain completely. Then wait until the upper soil feels partly dry before watering again. A calendar is less reliable than the soil and pot weight. I sometimes watered too soon because the surface looked dry. That mistake delayed recovery.
Check roots only when the plant keeps declining. Healthy roots are firm and light colored; mushy, dark roots need careful trimming with clean scissors. Use fresh, airy soil, but avoid disturbing the root ball unnecessarily. Keep humidity moderate and airflow gentle. Remove badly burned leaves, not every imperfect one. New growth is the clearest test. Resume weak feeding only after several healthy leaves appear, using less than before.
After overfertilization, stop feeding and flush the growing medium with clean water. Allow excess water to drain completely. Remove crusted fertilizer from the surface. Yellow leaf edges, brown tips, and wilted roots often indicate salt stress, not hunger.
Wait for fresh growth before feeding again. University of Florida IFAS Extension lists saturated-media electrical conductivity above about 3.5 dS/m as excessive for many container crops. A basic EC meter can reveal lingering salts, although meters are not perfect. New leaves should appear normally sized, firm, and evenly colored. Roots should smell earthy, not sour. This waiting period may take two to four weeks.
Resume feeding at one-quarter of the label concentration. Apply it only to already moist media. Feed once, then watch the newest leaves for seven to ten days. If growth remains healthy, increase to one-half strength during the next feeding. The University of Connecticut Extension advises adjusting fertilizer through plant response, growth stage, and growing conditions rather than following a rigid calendar. Bright light, warm roots, and active growth usually support higher nutrient demand.
I once resumed feeding too quickly and repeated the damage. That mistake still matters. If leaf tips brown again, pause immediately and test the drainage water. A lower dose given consistently is safer than one strong correction. Salt readings can vary between wet and dry samples, so record the moisture level each time.
Brown leaf tips, curled edges, pale growth, and white crust on the soil may indicate excess salts. Similar symptoms can come from drought, pests, or root disease. Check before treating.
Stop fertilizing immediately. Do not add more nutrients to already stressed roots. The plant needs time.
Place the pot in a sink and use room-temperature water. Let water flow slowly through the drainage holes. Use about two to three times the soil volume. For a 20-centimeter pot, four to six liters may work.
Avoid flushing pots without drainage or pots that remain waterlogged. Saturated roots can lose oxygen quickly. Repotting may be safer. I once flushed too aggressively and worsened poor drainage.
Let all excess water drain away. Wait until the upper soil feels partly dry. Keep the plant in bright, indirect light, away from hot glass and harsh afternoon sun.
Inspect roots if the plant continues declining. Healthy roots feel firm and look light colored. Trim dark, mushy roots with clean scissors. Replace sour-smelling, saturated soil with fresh, airy soil.
Wait until several healthy new leaves appear. This may take two to four weeks. New growth matters more than older damage.
Begin with one-quarter of the previous concentration on moist soil. Watch new leaves for seven to ten days. If growth stays healthy, try one-half strength next time. I resumed too quickly once and repeated the damage. That mistake matters.
How to fix over-fertilized plants quickly begins with recognizing the warning signs, such as brown leaf tips, yellowing, wilting, crusty soil, or unusually slow growth. Stop applying fertilizer immediately, then flush the soil with clean water if the container drains well. Allow excess water to escape fully so dissolved nutrients are carried away without leaving the roots waterlogged.
Remove badly damaged leaves and trim unhealthy growth with clean tools, while leaving any healthy tissue in place. During recovery, provide stable light, moderate watering, good drainage, and comfortable root conditions. Avoid sudden environmental changes or additional treatments that may stress the plant. Once new, healthy growth appears, resume feeding gradually with a weaker application than usual. Monitor the plant closely and adjust watering or light as needed, since recovery can take time and healthy roots are essential for renewed growth.

TH Fertilizer